Step 0 - Credentials
Please, request your credentials for your team at fiware.d4m@orange.com. You will receive an email containing these fields that are required for the following steps:
| Field name | Description |
|---|---|
| {{token}} | API Key used for applications to access data |
| {{Fiware-Service}} | Service name |
| {{Fiware-ServicePath}} | Sub-service name |
In order test the API, we really recommend you use the following sample collection for POSTMAN extension for Google Chrome, all this guide samples and some additional operations are there.
Please, remember to create a POSTMAN environment with your credentials for this POSTMAN collection.You can modify this
Fiware EMTECH Hackathon Environment
Step 1 - Send data
Before doing any coding, identify the sensors on your device and decide which data do you want to send to the Cloud.
Sending data is as simple as sending an HTTP POST request using your API key with your measures. Please use “#” and “|” separators to split data and measures.
Please remember that you will need to send as query parameters on the URL your {{TOKEN}} and your device identifier.
| HTTP method | POST |
|---|---|
| URL | http://hackathon.villatolosa.com/ul/iot/d?i=myEdison&k={{TOKEN}} |
| HTTP Headers | - |
| HTTP Body | t|15.5\#p|1015\#g|40.516304/-3.661756\#a|"some-text"\#h|33.5 |
Take into account that no device provisioning or data modeling is required in advance to send your device data. Anyway, we recommend to use short magnitude identifiers (like "t", "p" on the sample) to reduce the message length sent from the device.
Your will simply receive an HTTP 200 OK response to confirm the data was properly received at the Cloud.
Step 2 - Get data
Your device data is now stored in the Cloud, lets get it via API.
| HTTP method | GET |
|---|---|
| URL | http://hackathon.villatolosa.com/cb/v1/contextEntities/myEdison |
| HTTP Headers | - |
You will get you device data in a json document like this that is FIWARE NGSI compliant:
| HTTP response code | 200 |
|---|---|
| HTTP response headers | Content-Type: application/json |
| HTTP Body | { "contextElement": { "type": "edison", "isPattern": "false", "id": "myEdison", "attributes": [ { "name": "TimeInstant", "type": "ISO8601", "value": "2015-06-25T14:13:54.953107" } [...] ] }, "statusCode": { "code": "200", "reasonPhrase": "OK" } } |
Please, notice that you will see one attribute per sensor.
Step 4 - Show in a dashboard
JSON documents are fine, but dashboards are better for humans. If you want to create a responsive website to see your device data at the Cloud don’t do it from the scratch, just sign up at:
After this, you will be able to create a dashboard:

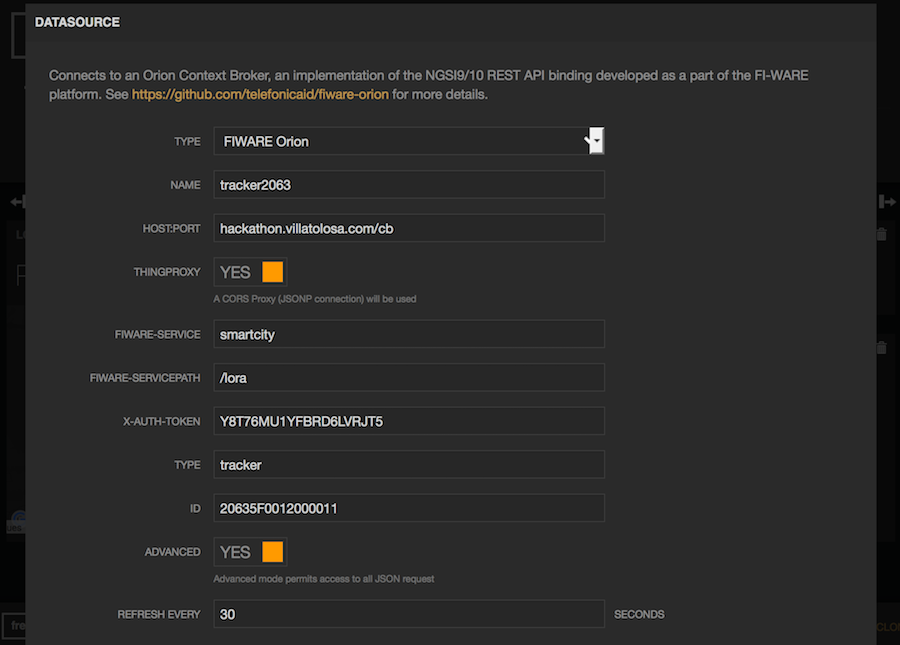
Once your are at your new dashboard, create an Orion FIWARE datasource per device.
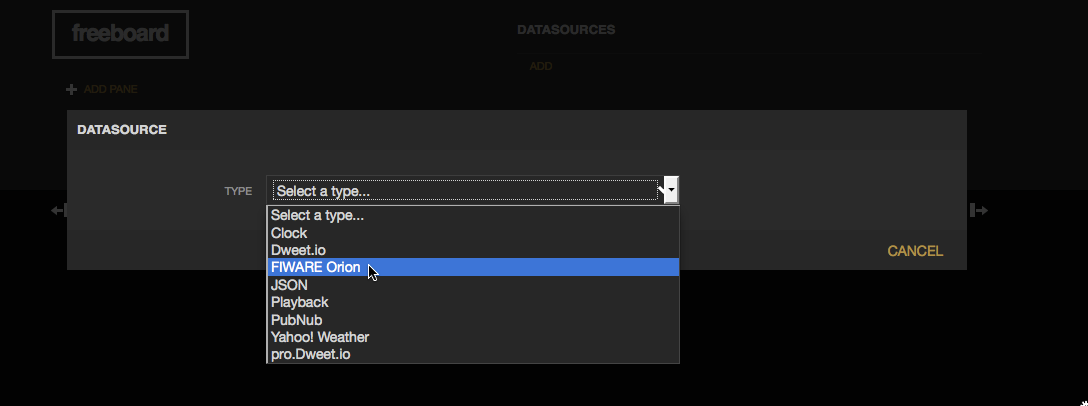
On the FIWARE Orion datasource configuration introduce there your credentials and your device type and ID as retrieved on Step 2 from the Cloud API.
Now it’s time to add widgets to your dashboard, representing your device data.
Anyway, you can always clone this sample freeboard and use it as a template for yours:
https://freeboard.io/board/HBEY35
Step 5 - Send commands
You can send commands to the device in order to trigger any action like turning on a LED or a relay. In order to do so, you need to register your device.
Remember that you can also setup your device via API, you will find an example on the POSTMAN collection.
| HTTP method | POST |
|---|---|
| URL | http://hackathon.villatolosa.com/ul/iot/devices |
| HTTP Headers | - |
| HTTP Body | { "devices": [ { "device_id": "myEdison", "entity_name": "myEdison", "entity_type": "edison", "protocol": "PDI-IoTA-UltraLight", "attributes": [ { "object_id": "l", "name": "lux", "type": "string" }, { "object_id": "p", "name": "button", "type": "string" } ], "commands": [ { "name": "SET", "type": "command", "value": "myEdison@ledr|%s" } ] } ] } |
Once the command is configured, you can send commands to the device just updating the entity attribute associated to that command.
The commands will be received on the device endpoint if configured on the device setup. Remember that if you left that field empty, the commands can be pulled directly from the device:
| HTTP method | GET |
|---|---|
| URL | http://hackathon.villatolosa.com:8080/iot/d?i=myEdison&k={{TOKEN}} |
| HTTP headers | - |
The command received will be as follows:
| HTTP Response code | 200 |
|---|---|
| HTTP Body | device\_id@{{command\_name}}|{{comand\_params}} |
In more detail …
Sending data
Devices can provide data using many other protocols like MQTT or COAP, it is also feasible to set different timestamps, configure customized mappings between physical device and virtual entity, or provision measures via HTTP GET. Read the full detail at:
More info: Device API guide
Data API
Data API is FIWARE NGSI compliant so it provides lots of features: subscriptions, partial updates, bulk entities retrieval, regular expression queries, geolocated entities search.
http://es.slideshare.net/fermingalan/fiware-managing-context-information-at-large-scale
More info: Data API guide
Historic Data API
Historic data is accessible using the Short Term historic API.
RAW data query example
| HTTP method | GET |
|---|---|
| URL | http://hackathon.villatolosa.com/sth/type/device/id/device:mydevice/attributes/h?lastN=10 |
| HTTP headers | Accept: application/json ; Fiware-Service: {{Fiware-Service}} ; Fiware-ServicePath: {{Fiware-ServicePath}} ; X-Auth-Token: {{user-token}} |
Aggregated data (sum/hourly) query example
| HTTP method | GET |
|---|---|
| URL | http://hackathon.villatolosa.com/sth/type/edison/id/myEdison/attributes/h?aggrMethod=sum&aggrPeriod=hour&dateFrom=2015-02-22T00:00:00.000Z&dateTo=2016-01-22T23:00:00.000Z http://hackathon.villatolosa.com/STH/type/type/device/id/myEdison/attributes/h?lastN=10 |
| HTTP headers | Accept: application/json ; Fiware-Service: {{Fiware-Service}} ; Fiware-ServicePath: {{Fiware-ServicePath}} ; X-Auth-Token: {{user-token}} |
Remember that in order to collect historic data, it is necessary to configure the required subscription (endpoint: http://hackathon.villatolosa.com/sth/notify).
More info: Historic Data API